Building static libraries in XCode for reuse in other projects is supposed to be quite easy and straight-forward. However, if you’re planning to build a larger library (of C or C++ code for example) with lots of submodules contained in a directory structure, you will soon get problems with XCode – especially with the header file output of your library. But with some tricks it is still possible to get XCode to export your original header directory structure. It requires some manual work, though, and you might wonder how on earth this simple matter could be so complicated in XCode.
For reasons unknown to me, XCode hates subfolders in the source files directory. By default, it will copy all your header files in one directory, flattening your directory structure. So if you have some files in your folder structure like ./mylibrary.h, ./module1/functions.h and ./module2/functions.h, XCode will stupidly export only two header files in one directory: mylibrary.h and functions.h (the functions.h from module2 will overwrite the one from module1). Furthermore, you will get header inclusion errors if you have relative header file include statements like #include "../othermodule/otherfuncs.h".
To get around this, some tricks are necessary, which I’ll explain in the following example. For this, I suppose that we already have some C source code in different folders for our static library. If this is not the case, then you should at first create a folder structure with some empty header and source code files.
If you want to get started quickly, you can check out my “project templates” repository at github. I’ve added a “StaticLib” example project there.
For manual setup, follow these steps:
Create a static library project in XCode with File > New > Project > Library & Framework > Static Library. You should delete the auto-generated Objective-C source code files, if you don’t need them.
In your project’s “Build Settings” set the “Public Headers Folder Path” in the “Packaging” section to include/${PRODUCT_NAME}. This will be the output path for our library’s header files.
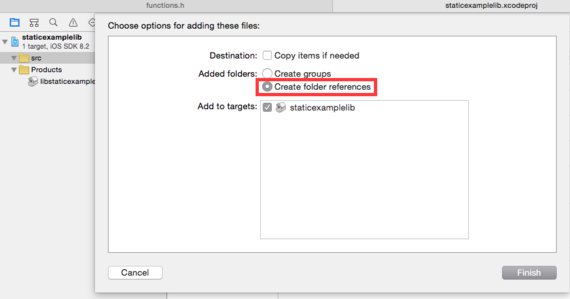
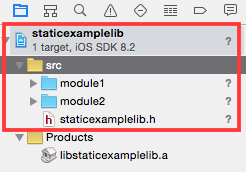
Now comes the trickiest part: First, in the “Project Navigator” tab in the left pane, create a new group, you can name it “src”. This will create a yellow folder icon in this view. Now in OSX Finder, go to your C source code root directory – I’ll also name it “src”. Suppose you have a file mylibrary.h and two subfolders module1 and module2 in your source code root directory. Drag & drop these elements to the Project Navigator tab. Now when XCode asks to add the elements to your project you must select “Create folder references”. Under “Add to targets:”, select your library. This will create two blue folders which contain your source code.
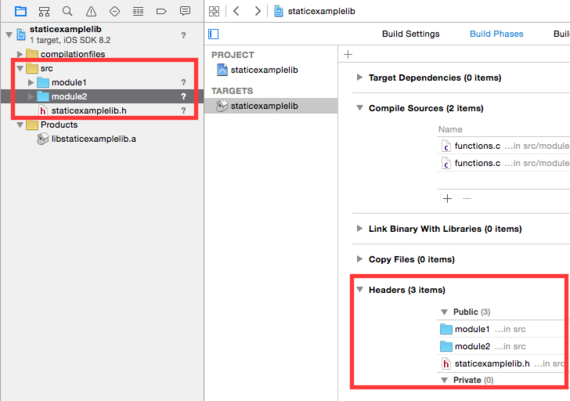
For unknown reasons to me, XCode will not add your source files to the “Compile Sources” build phase, although you selected the right target. So we have to do this manually: In your project target settings go to the “Build Phases” tab. Here, another strange XCode behaviour will strain our nerves: It is not possible to add the source code files with the “+” symbol when they are in those blue “folder references”. You will need to drag & drop them from the Project Navigator on the left side. You will need to do this for each single source file, which is extremely annoying, but I couldn’t find any other way.1
We’re still in the “Build Phases” tab. There, let’s add a build phase to copy our header files by going to “Editor > Add Build Phase > Add Headers Build Phase”.2 Now drag and drop each blue folder and also possible header files in your source root directory to the “Public” section in the “Headers” build phase. You can now already test if everything works by selecting “Product > Build” (Cmd+B). In the Project Navigator, you will find your library in the “Products” group. Right click on it and select “Show in finder”. You will find your compiled library and the headers in the “include” folder.
You will notice that the “include” folder also contains the C source files in its subfolders, because XCode stupidly also copies them in the “Copy headers” build phase. This is of course not what we want. So we will need to run a clean up script afterwards. Go to the “Build Phases” view again and select “Editor > Add Build Phase > Add Run Script Build Phase”. In this new “Run Script” build phase, add the following shell script code:
find ${TARGET_BUILD_DIR}/include/${TARGET_NAME} -name '*.c' -exec rm -f {} \;
This will recursively delete all .c-files in the header file output path. You can of course modify it to delete .cpp-files, but please watch out what you do and double-check it for typos, as otherwise the script might delete files that it better should not delete.
So now you’re finally ready to build your library and you can check that only .h-header files are located in the header output directory. If you don’t want XCode to put your compiled library in some cryptic folder somewhere on your harddrive, you can also specify an output path under “File > Project Settings” and set “Derived data location”.
As I said in the beginning, it is ridiculously complicated to get this running in XCode, but once you’ve set it all up, it works well. There is only one annoying thing that you should consider: You cannot add source code files to your project directly in XCode any more (if they should appear in a blue folder reference)! It will somehow screw up the directory structure. You need to create a file manually (e.g. via touch in the Terminal) and it will show up immediately if it’s in a blue folder reference. You then also need to add it to the “Compile Sources” build phase, as described above.
-
You will notice that XCode will add a reference to your source files in your “Project navigator” on the top level. Don’t delete them, XCode needs that and they don’t harm. You can but them in a separate group folder, so they don’t distract you. ↩
-
Please note that XCode can be extremely mischievous here, regarding user experience: If you find yourself wondering why the above options are grayed out, you should click somewhere on the white space in the “Build Phases” view. ↩